The most appropriate way to do so is to use Kamal’s modified kernel with ST7735R support. The 1.8″ TFT from Adafruit is the perfect display to attached to a Raspberry Pi.
- Spaghetti style
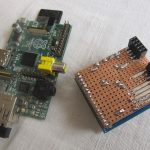
- The breakout took couple tries to get right; Powered by the 5V line
- sudo fbi -T 1 -a -d /dev/fb1 file
- Overall dimensions
These instructions also help with the Sainsmart display and you can find more info for both here: http://www.whence.com/rpi/
The TFT isn’t ‘plug & play’ with the Raspberry, a patch has to be applied to the kernel to be able to interface via SPI with the ST7735R controller chip on the TFT. Once working, the display will act as a framebuffer device.
I spent two weeks trying to get it working, so I thought I would document it to help others.
Thanks go to Kamal (http://www.whence.com/rpi/) and Neil for responding to my emails & forum post, and their work on the ST7735R driver.
Thanks also go to Adafruit for their cool products.
Thanks also go to Adafruit for their cool products.
As it takes over three hours to compile the kernel on the PI, I will show how to cross compile from another Linux PC. In my case, it is Ubuntu 12.10 running within VMWare on a Windows 7 Quad core PC. Kernel compile time is 15 mins.
Wire it up

Sainsmart wiring details are here on Kamal’s page: http://www.whence.com/rpi/
You could also use a shield to make the wiring a lot easier, look here
Prepare the Raspberry Pi
-Download and install Raspbian “wheezy”.
This guide is based on 2013-02-09-wheezy-raspbian which is running 3.6.11 kernel
This guide is based on 2013-02-09-wheezy-raspbian which is running 3.6.11 kernel
-Configure your Pi. E.g. Memory split, overclocking, etc..
pi@raspberrypi ~ $ sudo raspi-config
-Update firmware and reboot. I use Hexxeh’s script to update my firmware, which also needs GIT.
pi@raspberrypi ~ $ sudo apt-get update
pi@raspberrypi ~ $ sudo apt-get install git-core
pi@raspberrypi ~ $ sudo wget http://goo.gl/1BOfJ -O /usr/bin/rpi-update
pi@raspberrypi ~ $ sudo chmod +x /usr/bin/rpi-update
pi@raspberrypi ~ $ sudo rpi-update
pi@raspberrypi ~ $ sudo apt-get install git-core
pi@raspberrypi ~ $ sudo wget http://goo.gl/1BOfJ -O /usr/bin/rpi-update
pi@raspberrypi ~ $ sudo chmod +x /usr/bin/rpi-update
pi@raspberrypi ~ $ sudo rpi-update
Compile the Kernel
We will be cross compiling the kernel as compiling a kernel on the Raspberry Pi takes forever.
-Install packages used for cross compiling on the Ubuntu box.
mark@ubuntu~$ sudo apt-get install gcc-arm-linux-gnueabi make git-core ncurses-dev
-Get Kamal’s source which has the patch for ST7735R controller and the branch for the kernel that is used in 2013-02-09-wheezy-raspbian, which is 3.6.y;
mark@ubuntu~$ git clone git://github.com/kamalmostafa/raspberrypi-linux.git
mark@ubuntu~$ cd raspberrypi-linux
mark@ubuntu~$ git checkout rpi-3.6.y+kamal-st7735fb
mark@ubuntu~$ cd raspberrypi-linux
mark@ubuntu~$ git checkout rpi-3.6.y+kamal-st7735fb
-Grab the current config off the Raspberry Pi.
pi@raspberrypi ~ $ sudo zcat /proc/config.gz > config
-Copy config from the Raspberry Pi to the Ubuntu box using SCP. Replace ‘raspberrypi’ below with the IP address of your Raspberry Pi if hostname lookup fails.
We will then rename it once it is on the Ubuntu box
We will then rename it once it is on the Ubuntu box
mark@ubuntu~/raspberrypi-linux$ sudo scp pi@raspberrypi:config .
mark@ubuntu~/raspberrypi-linux$ mv config .config
mark@ubuntu~/raspberrypi-linux$ mv config .config
-Configure .config to include the new patch and options.
mark@ubuntu~/raspberrypi-linux$ make ARCH=arm CROSS_COMPILE=/usr/bin/arm-linux-gnueabi- oldconfig
You will be asked some questions for the new driver. If you are unsure of what values to use, then use these;
BCM2708 SPI controller driver (SPI0) (SPI_BCM2708) [N/m/y/?] (NEW) Y
…
ST7735 framebuffer support (FB_ST7735) [N/m/y/?] (NEW) Y
ST7735 ‘red tab’ panel type? (FB_ST7735_PANEL_TYPE_RED_TAB) [Y/n/?] (NEW) Y
ST7735 panel has reversed RGB? (FB_ST7735_RGB_ORDER_REVERSED) [N/y/?] (NEW) N (or Y if red and blue are reversed)
ST7735 framebuffer mapping to GPIO/SPI (FB_ST7735_MAP) [Y/n/m/?] (NEW) Y
ST7735 RST gpio pin number (FB_ST7735_MAP_RST_GPIO) [-1] (NEW) 25
ST7735 D/C gpio pin number (FB_ST7735_MAP_DC_GPIO) [-1] (NEW) 24
ST7735 SPI bus number (FB_ST7735_MAP_SPI_BUS_NUM) [0] (NEW) 0
ST7735 SPI bus chipselect (FB_ST7735_MAP_SPI_BUS_CS) [0] (NEW) 0
ST7735 SPI bus clock speed (Hz) (FB_ST7735_MAP_SPI_BUS_SPEED) [4000000] (NEW) 4000000 (or 32000000 for SainSmart)
ST7735 SPI bus mode (0, 1, 2, or 3) (FB_ST7735_MAP_SPI_BUS_MODE) [0] (NEW) 0
You will need to confirm that “BCM2708 SPI controller driver” is set to Y;
mark@ubuntu:~/raspberrypi-linux$ grep SPI_BCM2708 .config
CONFIG_SPI_BCM2708=y
CONFIG_SPI_BCM2708=y
If the above result is N or M, you will need to edit .config and change it to Y.
mark@ubuntu:~/raspberrypi-linux$sudo nano .config
If you are planning on displaying the console on the TFT, then enabling these options in .config will allow you to change the font size and rotate the display later on.
CONFIG_FRAMEBUFFER_CONSOLE=y
CONFIG_FRAMEBUFFER_CONSOLE_ROTATION=y
CONFIG_FONTS=y
CONFIG_FONT_8x8=y
CONFIG_FONT_8x16=y
CONFIG_LOGO=y
CONFIG_FRAMEBUFFER_CONSOLE_ROTATION=y
CONFIG_FONTS=y
CONFIG_FONT_8x8=y
CONFIG_FONT_8x16=y
CONFIG_LOGO=y
-Now compile the kernel.
To enable parallel processing for a faster compile. If you have a dual core processor add -j 3 to the end of the command below. If you have quad core, add -j 6
mark@ubuntu:~/raspberrypi-linux$ make ARCH=arm CROSS_COMPILE=/usr/bin/arm-linux-gnueabi- -k
-Create modules on the Ubuntu box which we will copy over later.
mark@ubuntu:~/raspberrypi-linux$ sudo mkdir ../modules
mark@ubuntu:~/raspberrypi-linux$ sudo make modules_install ARCH=arm CROSS_COMPILE=/usr/bin/arm-linux-gnueabi- INSTALL_MOD_PATH=../modules/
mark@ubuntu:~/raspberrypi-linux$ sudo make modules_install ARCH=arm CROSS_COMPILE=/usr/bin/arm-linux-gnueabi- INSTALL_MOD_PATH=../modules/
-Copy the new kernel over to the Raspberry Pi
mark@ubuntu:~/raspberrypi-linux$ scp arch/arm/boot/Image pi@raspberrypi:.
pi@raspberrypi ~ $ sudo cp Image /boot/kernel.img
pi@raspberrypi ~ $ sudo cp Image /boot/kernel.img
-Now copy over the new modules. First remove the unneeded directories, otherwise you will be copying over 1.9GB
The last step below is to SCP the files from from Ubuntu to the Raspberry Pi. If you have trouble SCPing into your Ubuntu box you may need to install open SSH on Ubuntu with sudo apt-get install openssh-server. This step also copies the files from my home folder ‘mark’… yours would be different.
mark@ubuntu:~/raspberrypi-linux$ sudo rm -f -r ../modules/lib/modules/3.6.11+/build
mark@ubuntu:~/raspberrypi-linux$ sudo rm -f -r ../modules/lib/modules/3.6.11+/source
pi@raspberrypi ~ $ sudo rm -f -r /lib/modules
pi@raspberrypi ~ $ sudo rm -f -r /lib/firmware
pi@raspberrypi ~ $ sudo scp -r mark@ubuntu:/home/mark/modules/lib /
mark@ubuntu:~/raspberrypi-linux$ sudo rm -f -r ../modules/lib/modules/3.6.11+/source
pi@raspberrypi ~ $ sudo rm -f -r /lib/modules
pi@raspberrypi ~ $ sudo rm -f -r /lib/firmware
pi@raspberrypi ~ $ sudo scp -r mark@ubuntu:/home/mark/modules/lib /
-Reboot.
If everything went well, you should now have /dev/fb1.
Displaying the console on the TFT;
If you build the st7735 driver pair as built-in, add these options to the end of the line in
If you build the st7735 driver pair as built-in, add these options to the end of the line in
/boot/cmdline.txt. This will display the console on the TFT.
fbcon=map:10 fbcon=rotate:1 fbcon=font:ProFont6x11
Some programs that work with framebuffer devices
mplayer2 = video playback
Use;
Use;
pi@raspberrypi ~ $sudo mplayer -vo fbdev2:/dev/fb1 -x 128 -y 160 -zoom file
FBI = image viewer
Use;
Use;
pi@raspberrypi ~ $sudo fbi -noverbose -T 1 -a -d /dev/fb1 file
Links2 = web browser
Links2 uses directfb to speak to the TFT. And we need to configure directfb with our TFT details.
Links2 uses directfb to speak to the TFT. And we need to configure directfb with our TFT details.
pi@raspberrypi ~ $sudo vi /etc/fb.modes
-Add these lines to the end of the file
mode “128×160″
geometry 128 160 128 160 16
timings 0 0 0 0 0 0 0
endmode
geometry 128 160 128 160 16
timings 0 0 0 0 0 0 0
endmode
-Update /etc/directfbrc. If the file doesn’t exist, create it.
pi@raspberrypi ~ $sudo vi /etc/directfbrc
-Add these lines to the end of the file
fbdev=/dev/fb1
mode=128×160
mode=128×160
-To run
pi@raspberrypi ~ $sudo links2 -g -mode 128x160x32k http://www.google.com
Device Drivers --->
  Graphics support --->
    Console display driver support  --->
      <*> Framebuffer Console support
      [ ]   Framebuffer Console Rotation
      [*] Select compiled-in fonts
      [ ]   VGA 8x8 font
      [ ]   VGA 8x16 font
      [ ]   Mac console 6x11 font (not supported by all drivers)
      [ ]   console 7x14 font (not supported by all drivers)
      [ ]   Pearl (old m68k) console 8x8 font
      [ ]   Acorn console 8x8 font
      [*]   Mini 4x6 font
      [ ] Sparc console 8x16 font
      [ ] Sparc console 12x22 font (not supported by all drivers)
      [ ] console 10x18 font (not supported by all drivers)
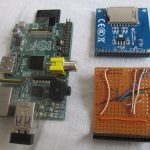
The LCD I have is not an original Adafruit, nor SainSmart but rather cheap clone, $5 on ebay, still using the same chip. Pins are different from the above mentioned products too. I made a vero-board breakout:
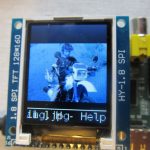
The images are quite bluish, I guess I need to do some gamma correction. Please tip me off if you have any idea on how to fix that. Pictured above is my son, looking like Avatar due to this issue.
UPDATE: The “Avatar” effect is overcome by applying a small fix to the drivers, as per the comments in the setup link above:
..you have to edit your local st7735fb.c in your github clone folder.
{ ST7735_CMD, ST7735_MADCTL},
{ ST7735_DATA, 0xc8}, //this make 0xc0
this was because the display (HY 1.8 SPI TFT haydooz..cheapest on ebay) is SRGB
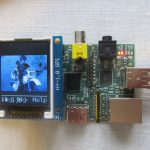
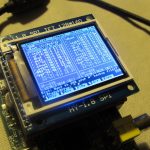
The screen runs as an additional framebuffer (/dev/fb1), independent of the HDMI/RCA, thus is perfect for a miniature status display. I am running fbterm on it. Here is my /boot/cmdline.txt
dwc_otg.lpm_enable=0 console=tty1 root=/dev/mmcblk0p2 rootfstype=ext4 elevator=deadline rootwait fbcon=map:10 fbcon=rotate:1 fbcon=font:MINI4x6
To use X on that display, you may need to add the following to /etc/X11/xorg.conf
Section "Device"
 Identifier "uga"
 driver "fbdev"
 Option "fbdev" "/dev/fb1"
 Option "ShadowFB" "off"
EndSection
Section "Monitor"
 Identifier "monitor"
EndSection
Section "Screen"
 Identifier "screen"
 Device "uga"
 Monitor "monitor"
EndSection
Section "ServerLayout"
 Identifier "default"
 Screen 0 "screen" 0 0
EndSection

- Fixed “Avatar” effect
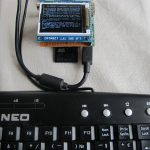
- Keyboard attached..
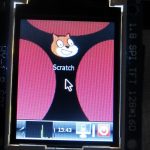
- X running
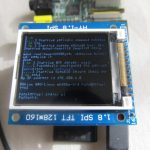
- Logging in
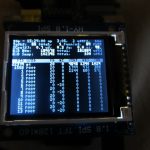
- Midnight Commander
No comments:
Post a Comment